An Effective Wind Scoop for your Boat's Fore Hatch
Key Takeaways: Keeping a sailboat cool and comfortable in the tropics relies on a multi-faceted approach. Prioritise non-powered ventilation using wind scoops and cross-breezes to keep air moving. Supplement this with shading (awnings, boom tents) to block solar heat. Finally, use efficient 12V fans for internal circulation and solar fans to exhaust hot, moist air, which is essential for managing humidity and preventing mildew.
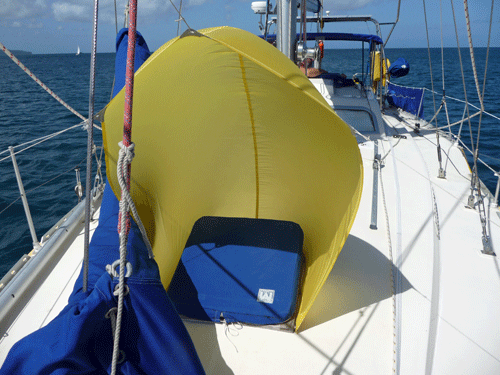
At anchor in a hot climate, a wind scoop fitted in you boat's fore hatch will transform living conditions below. There are several different designs available if you want to buy one, but here's a simple and effective version that can be easily and cheaply made up from a single piece of light fabric.
Sadly, I can't take any credit for the design of this; I believe - although I'm not certain - that this should go to the renowned cruising couple, Lynn and Larry Pardy.
As you can see, it's made from two pieces of nylon spinnaker cloth stitched together and attached around the outside of the foredeck hatch surround.
Attached thus, you can close the hatch from below when it starts to rain.
An ordinary domestic sewing machine will be able to handle this easily, but for maximum durability you should use a zig-zag stitch and UV-resistant thread.
How to Make The Wind Scoop
If your hatch is hinged at the forward edge as shown above (the most seaworthy approach), a partially closed hatch - as in the above pic - will still provide ample ventilation whilst preventing rainwater from getting below.
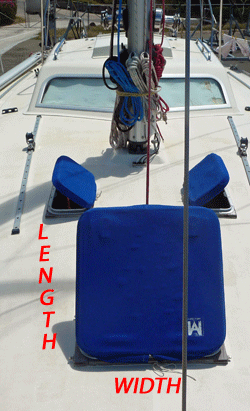 Measure twice, cut once...
The first step is to measure the outside dimensions of the fore deck hatch surround - the length and the width - to determine the length of the foot of the wind scoop.
Cutting Out the Two Pieces of the Windscoop
The first piece is shaped as shown below. It's a right-angled triangle, the longest side of which is curved.
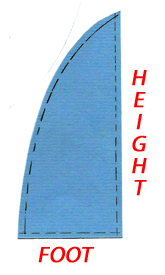 One half of the windscoop...
The length of the foot is half the WIDTH plus the LENGTH of the hatch surround as measured in the first step.
The height is about three times the length of hatch surround - that's usually around 5 feet (1.5m) or so.
The curved edge should approximate to the shape shown. Allow 1" (25mm) all round for seaming.
The second piece is a mirror image of the first one, so use one as a template to draw the other.
Then cut them both out and stitch them together along the curved edge as shown below. Ideally, you'll use a zig-zag stitch for this.
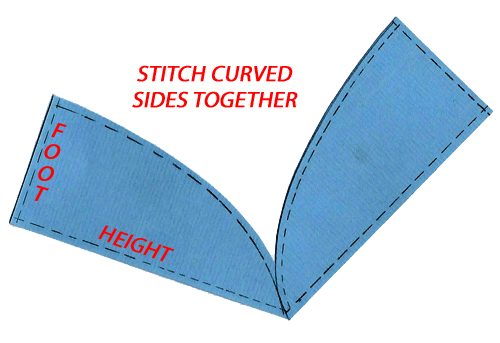 Cut another one on the opposite hand, and stitch them together. How simple is that?
Then turn in the remaining seams and stitch them together. Just two more things to attend to:
- Holding it down and
- Holding it up...
Holding the Wind Scoop Down
On Alacazam, the fore hatch is bedded on a teak surround which makes holding it down with lift-the-dot fasteners a cinch.
Two of these are fitted to each of the three sides, the male part screwed into the surround, and the female part pressed into the seam around the foot of the windscoop. No special tools are needed.
Holding the Wind Scoop Up
Using a halyard to hold it up just doesn't work - you need to hold it both up and forward. First though you need to provide an attachment point on the windscoop for a light line - a short loop of webbing strap stitched on is ideal.
If you're lucky you'll have a convenient forestay, cutter stay or babystay to attach it to. Otherwise you'll have to be a little more creative. One solution would be to take a halyard down to a deck fitting just ahead of the hatch.
You'll find that this wind scoop will direct an impressive breeze throughout the boat which you can vary by adjusting the position of the hatch cover.
Summing Up
Keeping a sailboat cool and comfortable in the tropics relies on a multi-faceted approach. Prioritise non-powered ventilation using wind scoops and cross-breezes to keep air moving. Supplement this with shading (awnings, boom tents) to block solar heat. Finally, use efficient 12V fans for internal circulation and solar fans to exhaust hot, moist air, which is essential for managing humidity and preventing mildew.

This article was written by Dick McClary, RYA Yachtmaster and author of the RYA publications 'Offshore Sailing', member of The Yachting Journalists Association (YJA), erstwhile member of the Ocean Cruising Club (OCC) and owner/administrator of 'Liveaboard Sailboats for Sale'.

Recent Articles


-
Discovery 55 Sailboat Review: Specs, Ratios & Bluewater Capability
Oct 14, 26 06:04 AM
Detailed Discovery 55 buyer’s guide covering specs, ratios, sailing behaviour, problem areas and bluewater suitability. -
Should I Buy a Boat? Four Questions to Answer Before You Commit
Oct 02, 26 04:40 AM
Thinking "Should I buy a boat?" This guide helps you decide, with key considerations from cost & maintenance to your personal sailing aspirations. -
Offshore Internet with Starlink: Hardware, Plans, and Setup Guidance
Oct 01, 26 01:15 PM
A clear, practical guide to choosing the right Starlink hardware and plan for offshore cruising. Learn what to buy, how to install it, and how to manage power afloat.

