- Home
- Essential Knots
- How to Tie a Bowline
How to Tie a Bowline: The Sailor's "King of Knots" & Explained
In a Nutshell...
The bowline is a simple, non-slip loop knot that is easily tied and untied, even after bearing a significant load. Its primary use is to create a secure loop at the end of a line for tasks like attaching sheets to a clew, mooring to a piling, or creating a rescue sling. The classic "rabbit out of the hole" method is the most reliable way to learn & master this essential sailor's knot.

Table of Contents
The Bowline: Why Every Sailor Needs to Know It
As an experienced offshore sailor, I can tell you that few things are as vital on a sailboat as a reliable knot. From the moment you cast off the lines to dropping anchor in a new bay, knots are the unsung heroes of every passage. And if there is one knot that deserves to be called the "king," it's the bowline.
When I took my RYA 'Offshore Yachtmaster' Practical all those years ago, the examiner required me to tie this knot with my eyes closed and with one hand—not a skill you need for a weekend cruise, but it speaks volumes for the knot's importance. It's the knot I use to attach a jib sheet to the sail's clew, create a temporary loop for a fender line, & even form a rescue sling in an emergency. The beauty of the bowline is its simplicity: it forms a fixed, non-slip loop that holds fast under load yet is always easy to untie, even after being soaked and strained. Here I'll walk you through the classic method for tying a bowline, explain its many uses, & offer some pro tips to ensure your knot holds true.
How to Tie a Bowline: The Classic Method
The bowline knot - pronounced 'bo-lin' - is probably the best known and most frequently used knot for forming a loop in the end of a line, or to attach an object to the end of a line.
It's used almost exclusively when attaching a sheet to the clew of a headsail. Underload, the bowline a reliable knot.
Nevertheless it's easy to undo, and therein lies its weakness because if the headsail is allowed to flog the bowline can shake itself loose and detach itself from the sail.
If this happens with a high-cut jib the clew will be out of reach - you'll have to drop the sail to re-attach the sheet, which is less than ideal in anything of a blow!
In this situation the 'Lightning method' of forming a bowline knot is the way to go.
Like all knots, the bowline will reduce the breaking strain of the line in which it's tied. In the case of the bowline the average loss of strength is around 35% in a braided polyester rope, and considerably more in a Dyneema line.
The Double Bowline is a stronger version of the Bowline Knot.
See also the Bowline on a Bight, a two-loop rescue knot for a man overboard.

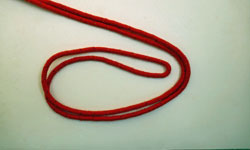
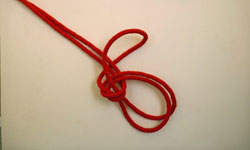
Stage 1
Make a loop as shown. Note that working end of the line passes under the standing part at the bottom of the loop.

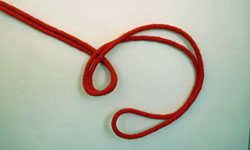
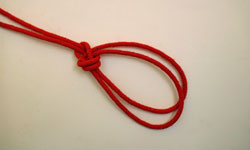
Stage 2
Tuck the working end through the loop from front to back.

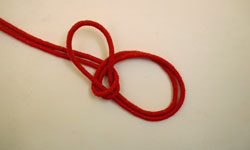
Stage 3
Bring the working end over the standing part, then tuck it through the loop from back to front.

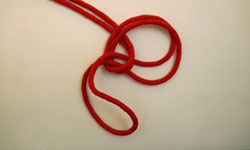
Stage 4
Cinch up the knot by holding the working end and newly formed loop and pulling on the standing part - and you have your bowline!
How to Tie the Bowline by the Quick & Easy 'Lightning' Method
With practice, the 'Lightning' method can produce a bowline in seconds.
It's very useful when re-attaching an errant sheet to a headsail, as the bulk of the bowline can be tied before having to wrestle with the sail.
 |
Stage 1 Make a loop as shown. Note that working end of the line passes under the standing part at the bottom of the loop. |
 |
Stage 2 Insert a bight from the working end of the line through the loop from front to back, forming a slip knot. |
 |
Stage 3 Tuck the working end through the bight where it emerges from the loop. |
 |
Stage 4 Holding the working end and the standind part together, pull on the lower part of the loop. The slip knot will collapse forming a bowline - magic! |
How to Tie the Double Bowline
The Double Bowline is more frequently used by climbers than sailors, but it is undoubtably a stronger version of the standard bowline and is therefore worthy of inclusion here.
")
Stage 1
Make a loop as shown. Note that working end of the line passes under the standing part at the bottom of the loop.
")
Stage 2
Now make a second identical loop beneath the first one.
")
Stage 3
Tuck the working end through both loops from front to back.
")
Stage 4
Bring the working end over the standing part.
")
Stage 5
Now tuck the working end through the loop from back to front.
")
Stage 6
Cinch the knot up tight. You have now tied a Double Bowline!
How to Tie the Bowline on a Bight
The Bowline on a Bight provides a large pair of loops at the end of a rope. Tied in the end of a spinnaker halyard - provided the halyard is long enough - it can be used to recover a man overboard.
If the halyard isn't long enough you'll need to tie the Bowline on a Bight in a separate line with a loop at the other end to attach to the halyard.
If the casualty is conscious he slips a leg into each loop and hangs on tightly to to the halyard whilst a crewmember hoists him back aboard. Males may well complain bitterly about the location of the loops and need to be reminded that it's better than drowning.
An unconscious person will have one loop slipped under his arms and his legs inserted into the other before being hoisted aboard.
A quick and easy knot to tie, the Bowline on a Bight is also easy to untie even after it's been put under heavy load.
Stage 1
Form a long bight.
Stage 2
Maintaining the long bight, form a loop in it as shown here.
Stage 3
Now pass the working end of the bight through the loop from back to front.
Stage 4
Now open up the section of the bight that has been passed through the loop.
Stage 5
Pass the opened bight over the rest of the knot until it finishes up encircling both standing ends.
Stage 6
Finally pull it tied. You've just made a Bowline-on-a-Bight!
Common Bowline Failures & How to Avoid Them
Even experienced sailors can tie a poor bowline, especially in a hurry. The most common mistake is creating a "cowboy" or "Dutch" bowline, where the final tuck is reversed. This can weaken the knot significantly & cause it to slip under load.
- Check: Always "dress" the knot by ensuring all parts of the rope are neatly aligned.
- Set: Give it a sharp tug on the standing part and the loop to ensure it's properly set.
- Back-Up: For critical applications, like mooring, consider adding a backup knot (like a stopper knot) or a second bowline to the bitter end for added security. I've seen some sailors use a figure-eight stopper knot as a simple & effective backup.
The Bowline vs. Other Knots
| Knot | Purpose | Pros | Cons |
|---|---|---|---|
| Bowline | Creating a fixed loop | Easy to tie/unite, holds firm, non-slip | Can fail if improperly tied |
| Figure-Eight Loop | Creating a secure loop | Extremely strong, very reliable, doesn't slip | Can be difficult to untie after heavy load |
| Clove Hitch | Securing a line to a piling or rail | Quick & easy to tie/unite | Can slip under heavy or cyclical load |
| Sheet Bend | Joining two ropes together | Strong, reliable for different rope diameters | Not for creating a loop, can slip if not dressed |
But this is just a few of the important ones. For the others, take a look at A Sailor's Guide to Essential Knots & Splicing.
By Dick McClary, RYA Yachtmaster Offshore & member of the Yachting Journalists Association (YJA)
Frequently Asked Questions (FAQs)
Is the bowline a secure knot?
Is the bowline a secure knot?
Yes, the bowline is one of the most secure and trusted knots for creating a non-slip loop. However, like any knot, its security depends on being tied correctly and being "dressed" properly.
What is the main use of a bowline?
What is the main use of a bowline?
The bowline is primarily used to create a fixed loop at the end of a rope. Common sailing applications include attaching a line to a clew, securing a mooring line to a piling, or creating a temporary rescue sling.
Can a bowline come undone on its own?
Can a bowline come undone on its own?
A correctly tied bowline is very unlikely to come undone on its own under normal load. However, a poorly tied or "Dutch" bowline can slip. For critical situations, adding a backup stopper knot to the bitter end is a good practice.
Sources
Recent Articles
-
Westerly Cirrus – Specs, Performance & Buyer’s Guide for the Cirrus 22
May 14, 26 03:32 PM
An in‑depth Westerly Cirrus 22 review covering specs, design ratios, sailing performance, bluewater limits, common issues and buyer’s checklist for this classic 22‑foot Westerly cruiser. -
Shearwater 45 Sailboat Review – Specs, Ratios & Bluewater Capability
May 14, 26 04:28 AM
A practical, owner‑focused review of the Shearwater 45 sailboat covering specs, design ratios, bluewater suitability, layouts, common issues and buyer tips for serious cruisers. -
Jeanneau Sun Odyssey 519 Review – Specs, Ratios & Cruising Insight
May 11, 26 03:32 AM
In‑depth Jeanneau Sun Odyssey 519 review covering specs, design ratios, sailing performance, bluewater capability, layouts and buyer checklists for serious cruisers researching this modern 50‑footer.

A few of our Most Popular Pages...


Copyright © 2026 Dick McClary Sailboat-Cruising.com