- Home
- Rigging
- Standing Rigging Inspection Checklist
- Swage Vs Mechanical Terminals
Swage or Mechanical Terminals? Spotting Failure and Choosing Fittings
Key Takeaways: Most swaged terminals don't fail by the wire pulling out. They fail by cracking, usually through corrosion inside the fitting, and most often at the lower end of a shroud where water wicks in. Fine cracks can be invisible to the naked eye, so inspect with a magnifying glass and torch, and use dye penetrant testing when the load is off. A vertical split along the barrel points to corrosion, while a horizontal crack points to fatigue and means replace immediately.
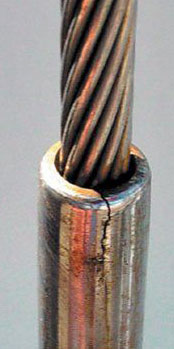 A split along the barrel of a swaged terminal: the wire inside has had its protection compromised
Mechanical terminals such as Sta-Lok, Norseman and Hi-Mod cost more but can be unscrewed, inspected and reused, and a competent owner can fit them with hand tools if they follow the maker's instructions exactly.
Many cruisers fit swages aloft and mechanical terminals at deck level, and carry a few mechanical fittings as an emergency repair kit.
Almost every cruising boat has swaged terminals somewhere on the rig, and most of them do their job quietly for years. The trouble is that when they fail, they tend to fail suddenly and from the inside.
This guide explains how to spot a failing swage, how dye testing helps, and when it's worth choosing mechanical terminals instead. It builds on the terminal checks in our main inspection guide, A Sailor's Checklist: Inspecting & Maintaining Your Standing Rigging. It covers wire rigging, since rod terminals are different and need specialist attention.
How a Swage Terminal Fails
A swaged terminal grips the wire by friction after the fitting has been squeezed onto it under great pressure. It's cheap, quick to make and, for most sailors, gives long and reliable service. The failure mode is rarely the wire pulling out. Rigging writers and riggers commonly report that it's the fitting itself that cracks, mainly through corrosion that starts inside the barrel and works outwards.
The lower terminal usually goes first. Water runs down the wire and wicks into the mouth of the fitting, where there's little oxygen and nowhere for it to escape. That is ideal for crevice corrosion, and cracks form, much as a chip in a windscreen grows into a crack. Because the damage begins inside the fitting, the outside can look fine until a crack finally reaches the surface.
Spotting a Failing Swage: What to Look For
Clean the terminal first, take off any tape or covers, and use a magnifying glass and a bright torch. If you can slacken the rig, even slightly, it's easier to move the terminal around and see the whole surface.
| What You See | What It Probably Means | What to Do |
|---|---|---|
| A broken strand where the wire enters the terminal | Fatigue or corrosion at the most stressed point | Replace the wire and terminal; do not wait |
| A vertical crack or split along the barrel | Internal corrosion, usually from water trapped inside the fitting | Replace the terminal, and inspect the rest of the rig |
| A horizontal crack across the fitting | Metal fatigue; Practical Sailor says such fittings have no safety margin | Replace immediately and do not sail until fixed |
| Rust staining or weeping at the mouth of the fitting | Corrosion, possibly well advanced inside | Inspect closely with magnification and dye; replace if in doubt |
| A bulge, bend or distortion | Overloading or damage; a swage should be smooth and even | Treat as a serious red flag and have a rigger assess it |
| Hairline cracks only visible under magnification | Early cracking that is easy to miss | Replace, or confirm with dye penetrant testing before deciding |
| Irregular or poorly formed swage on new rigging | Possible out-of-specification work | Ask the rigger to check it and redo it if necessary |
If you find a cracked terminal, inspect the rest of the rig before sailing. The other terminals are probably the same age, were probably fitted in the same way, and may be suffering from the same fault.
Dye Penetrant: Seeing What the Eye Misses
Dye penetrant testing is a low-cost way to show up fine cracks that a magnifying glass can miss. A kit contains a cleaner, a dye and a developer. You clean the surface, apply the dye, wipe it off and apply the developer, and any crack shows as a visible line. It also helps you to tell a harmless scratch from a real crack. Follow the instructions on your kit, and test with the load off the terminal.
It's worth knowing the limits. Dye shows only cracks that reach the surface, and one owner reported that a terminal passed both dye and ultrasonic checks, so a clean result is reassuring but not a guarantee. If a terminal is old, or you aren't sure what you're seeing, a rigger can give you a second opinion.
Swage Versus Mechanical Terminals: The Trade-Offs
Mechanical terminals, such as those made by Sta-Lok, Norseman and Hi-Mod (Hayn), grip the wire with a cone or wedge inside a screw-together body. They're widely used on cruising boats, and there's a case for them in the right places.
| Factor | Swaged Terminals | Mechanical Terminals |
|---|---|---|
| How they are fitted | Pressed on with a swaging machine, by a rigger | Assembled with hand tools; can be fitted by an owner with care |
| Cost | Lower; quick and easy to make | Higher, though they are reusable |
| Inspection | Sealed; hidden cracks and internal corrosion are hard to see | Can be unscrewed, the wire end inspected, and the fitting reassembled |
| Typical failure | Cracking of the barrel, usually from internal corrosion, often at the lower end | Less prone to this, according to Practical Sailor, because of reduced crevice corrosion |
| Field repair | Not possible without a swaging machine | A cracked swage can be replaced with a mechanical terminal using wire and tools carried aboard |
| Reuse | No; replace the terminal with the wire | Terminals can be unscrewed, fitted with new cones and reused, according to rigging suppliers |
| Best suited to | Day sailors and coastal cruisers; the upper ends of shrouds and stays | Lower ends of shrouds, ocean cruisers, boats that need field-serviceable terminals, and emergency kits |
Makers describe their terminals as rated to the strength of the wire, but check the published rating for your wire size and type rather than assuming.
The Hybrid Approach: Swage Aloft, Mechanical Below
Because most swage failures happen at the lower end, many cruisers choose lighter swaged terminals at the masthead and mechanical terminals at deck level. Several rigging magazines describe this as a sensible compromise if you like the reliability of mechanical fittings but baulk at the cost of using them everywhere. It isn't a rule, and your rigger may have good reasons for a different approach on your boat, particularly if the rig is rod, discontinuous or unusual.
Fitting a Mechanical Terminal Yourself
With a coil of wire and some mechanical terminals aboard, a competent owner can make up a new shroud or stay with hand tools. That is a real advantage on a long passage. But it's a safety-critical job, so follow the manufacturer's instructions exactly, and consider having a rigger check your first one. This table lists what to verify, not a substitute for the maker's own procedure.
| Check | Why It Matters |
|---|---|
| Fitting matches the wire's diameter, construction and grade | Terminals are made for a specific wire size and construction; the wrong one won't grip properly |
| Wire cut cleanly and strands left undisturbed | Damaged or disordered strands weaken the connection |
| Maker's assembly sequence followed exactly | The cone or wedge and body must seat as designed |
| Wire correctly seated before final tightening | A partly seated wire can pull or fatigue in service |
| Fitting secured as the maker specifies | Prevents the body backing off under vibration |
| Photograph and record the job | Gives you a baseline for later inspection and a record for your insurer |
What About Bulldog Grips?
Bulldog grips, also sold as wire rope grips or clips, are a U-bolt, a saddle and two nuts. They're cheap, need no special tools and can be reused, which is why they turn up in so many emergency kits. But marine suppliers are blunt that they should never be used for standing rigging, and they're described as not suitable for permanent rigging solutions.
There are two problems. First, 1x19 wire is very stiff, and suppliers advise against using grips on it. Second, grips always reduce the strength of the wire, and fitting errors reduce it further. Even correctly fitted forged clamps are generally credited with around 80 percent of the wire's strength, and a UK P&I Club bulletin on wire rope grips warns that reversed grips can fail at around half of the wire's breaking load. Those are general wire-rope figures, not tests on rigging, but they show why this isn't a place for guesswork.
If you ever have to use grips to get home, use a thimble, fit at least three, put the saddle on the loaded part of the wire and the U-bolt on the dead end, space them about six wire diameters apart, and re-check the nuts after the first load. Treat it as a temporary repair and replace it with a proper terminal as soon as you reach a rigger.
| Situation | Bulldog Grips? | Reason |
|---|---|---|
| Permanent standing rigging | No | Marine suppliers advise against it; grips reduce strength and can't be inspected like a proper terminal |
| 1x19 stainless rigging wire | Not recommended | The wire is too stiff, and suppliers say grips are unsuitable for it |
| Flexible 7x19 wire for secondary or temporary use | Possible, with care | Suppliers recommend this wire construction for grips; fit correctly and check the rating |
| Temporary repair to get home | Last resort | Use a thimble, at least three grips, correct orientation, and replace as soon as possible |
| Joining two broken lengths | Possible, using thimbles | Make a loop in each length around a thimble and join them with a shackle |
Carry an Emergency Rig Kit
Mechanical terminals earn their keep at sea. With a length of spare wire, a few terminals of the right sizes and basic tools, the crew can replace a cracked swage or make up a whole new shroud while a long way from a rigger. Some manufacturers sell pre-packed emergency shroud kits. Pair these with bolt croppers and spare cotter pins, and see our guide to spares for long distance cruising for what else to carry.
Don't rely on bulldog grips as your repair kit: they weaken the wire, suit only flexible wire and are a last resort, so a few mechanical terminals of the right sizes are a far better use of locker space.
When to Replace the Whole Rig, Not Just One Terminal
A single cracked terminal is a prompt to look at the whole rig. If the wire is around ten years old, or the other terminals show signs of corrosion, replacing one terminal may only delay a bigger job. Read How Long Does Standing Rigging Last? Age, Sea Miles and the Insurer's Rule to help you decide, and if you do re-rig, ask your rigger whether to replace terminals, toggles and turnbuckles with the wire.
Summing Up
Swaged terminals are good value and do the job for most boats, but they fail by cracking, they fail from the inside, and they fail most often at the lower end. Inspect them with a magnifying glass, test them with dye when you can slacken the rig, and replace any terminal that shows a split, a horizontal crack, a broken strand or rust weeping. Mechanical terminals cost more but can be inspected, reused and fitted in the field, which makes them a good choice at deck level and a smart item in the spares locker. If one terminal has failed, look hard at the rest of the rig.
Frequently Asked Questions
Can I replace a cracked swage terminal with a mechanical one myself?
Can I replace a cracked swage terminal with a mechanical one myself?
Yes, a competent owner can make up a shroud or stay with mechanical terminals using hand tools, provided the fittings match the wire and the maker's instructions are followed exactly. For a primary rig wire, consider having a rigger check your first one.
Are Sta-Lok and Norseman terminals as strong as swaged ones?
Are Sta-Lok and Norseman terminals as strong as swaged ones?
Makers rate their terminals to the strength of the wire, and professional rigging regard them as a sound alternative. Check the published rating for your wire size and type, and make sure the fitting is correct for the wire's construction.
Which end of a shroud fails first?
Which end of a shroud fails first?
Usually the lower end. Water runs down the wire and wicks into the lower terminal, where crevice corrosion and cracking begin. That's why many cruisers use mechanical terminals at deck level and lighter swages aloft.
How often should I dye-test my swage terminals?
How often should I dye-test my swage terminals?
There's no fixed interval. A sensible approach is to test at each professional mast-up inspection, whenever the rig is slack, and any time a visual check leaves you in doubt. Dye shows only surface cracks, so treat a clean result as reassurance, not proof.
If a swage terminal looks fine, is it safe?
If a swage terminal looks fine, is it safe?
Not necessarily. Corrosion and cracking often begin inside the fitting, and very fine cracks can be invisible to the eye. Regular magnified inspection, dye testing and a rigger's assessment as the rig ages are the best defence.
Can I use bulldog grips on my standing rigging?
Can I use bulldog grips on my standing rigging?
No, not for permanent rigging. Marine suppliers advise against it, grips reduce the wire's strength, and they aren't suited to stiff 1x19 wire. As a last-resort temporary repair, use a thimble, at least three grips fitted the right way round, and replace the repair with a proper terminal as soon as you can.
Recent Articles


-
Swage or Mechanical Rigging Terminals? Spot Failure Early
Nov 20, 26 04:06 PM
Swage terminals can crack out of sight. Learn the warning signs, how dye testing helps, and when Sta-Lok or Norseman fittings are the better choice. -
Wauquiez Pilot Saloon 60 Review, Specs & Bluewater Buying Guide
Nov 20, 26 09:01 AM
Detailed Wauquiez Pilot Saloon 60 review covering specs, performance, seaworthiness, ownership, buyer checks and bluewater cruising suitability. -
Wauquiez Pilot Saloon 60 for Sale
Nov 20, 26 07:56 AM
Designed by Ed |Dubois, 'Alligator Uno' is a large, comfortable pilothouse cruising yacht built in 1994 with a fibreglass hull.