- Home
- Rigging
- Standing Rigging Inspection Checklist
- How to Inspect Hidden Chainplates
How to Inspect Hidden Chainplates and What to Do When You Can't See Them
Key Takeaways: Chainplates usually fail where you can't see them, through crevice corrosion in the stagnant, oxygen-starved water that collects where the plate passes through the deck or bolts to a bulkhead. A plate can look bright and sound above the deck while the hidden section is badly corroded. You can learn a lot without removing anything: look for rust staining, deck leaks, soft or discoloured bulkheads and movement at the deck. But the only reliable inspection of the hidden section is to take the plate out and examine it, ideally with dye penetrant to separate surface scratches from cracks. If your chainplates are encapsulated in the hull or bulkhead, treat them as unknown until someone has opened them up. Keep them well sealed, and make them accessible so that next time it's easy.
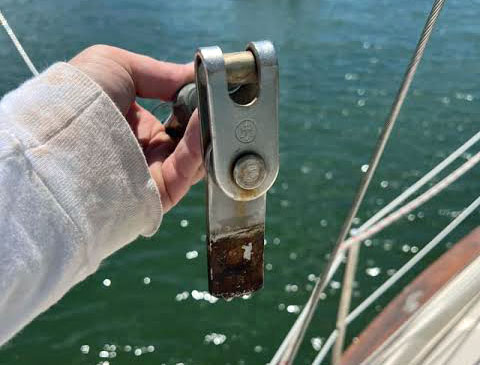 The visible part of a chainplate can look perfect while the hidden section is badly corroded
Every sailor who owns a boat with hidden chainplates has the same uneasy thought now and then. You can see the top of the plate, you can see a bit of a bolt below deck, and everything between is a matter of faith. This guide is about turning that faith into evidence. It builds on the chainplate checks in our main inspection guide, A Sailor's Checklist: Inspecting & Maintaining Your Standing Rigging, and goes much further into what to do when you can't see the whole plate.
Why Chainplates Hide Their Failures
Chainplates carry the full load of the shrouds into the hull, and they do it from the least accessible place on the boat. Stainless steel resists corrosion because of a thin protective oxide layer, and that layer needs oxygen to maintain itself. Where water sits in a tight space without oxygen, such as the gap between a plate and a deck slot or the sealed side of a bulkhead bolting, the layer breaks down and crevice corrosion begins. The damage can run along the plate out of sight, and cracks tend to form across the plate at right angles to the load.
Chainplates that pass through the deck also tend to leak, because they move under load and their sealant ages. The leak is the starting gun: water enters, becomes trapped, and the plate begins to corrode in the dark. This is why a chainplate that looks perfect from above tells you very little about the part below.
Know Which Type of Chainplate You Have
How worried you should be, and what you can do about it, depends on the type of installation. Work out which of these four applies to each of your chainplates before you plan an inspection.
| Type | Where It Hides Problems | Ease of Inspection | Typical Weak Point |
|---|---|---|---|
| External, bolted to the topsides | Little is hidden | Easy: most of the plate is in plain sight | Exposed to weather; the deck or hull penetration can leak |
| Internal, through the deck | Inside the deck slot and below deck | Moderate to difficult, depending on the boat | Water trapped in the sealant gap leads to crevice corrosion at the deck passage |
| Bolted to a bulkhead | Behind joinery, between plate and bulkhead | Moderate: the plate is often visible but its condition behind the bolts isn't | Only as strong as the bulkhead; water causes rot and delamination |
| Glassed in or encapsulated | Entirely inside the laminate or bulkhead | Very difficult or impossible without opening up | Hidden corrosion and moisture, and difficult replacement |
What You Can Check Without Removing Anything
Pulling chainplates isn't something you do every season, so start with the checks that cost nothing. Use a bright torch and a magnifying glass, and look at each plate from both sides wherever access allows.
| Check | How to Do It | Red Flag |
|---|---|---|
| Deck passage and sealant | Inspect the sealant and the area around the plate for gaps, lifting or hairline cracks | Failed sealant, water staining or any sign that water has been getting in |
| Below-deck moisture and staining | Check the locker or lining after rain or a wash-down, using a torch | Rust streaks, damp, white salt deposits or a musty smell |
| Bulkhead and surrounding structure | Look for discolouration, delamination and rot; tap lightly around the attachment | Dark staining, soft or hollow-sounding wood, lifting veneer or laminate |
| Deck core near the plate | Tap around the penetration with the handle of a screwdriver | A dull thud suggests a wet or delaminated core |
| Plate surface and eye | Look for pitting, discolouration and fine lines running across the plate, and inspect around the clevis pin or toggle eye | Rust-coloured pitting, horizontal hairline cracks, an elongated or worn pin hole |
| Movement | Watch the plate at the deck from a safe position as the rig is loaded | Any visible flexing, shifting or a gap opening and closing |
One more practical tip from the marine press: if you can reach the below-deck fasteners, backing out a few to look for moisture is a quick way to find out whether there's a leak at deck level. Do it with the load off the plate, and ask a rigger first if you're unsure how to do that safely on your boat.
When Looking Isn't Enough: Taking a Chainplate Out
The uncomfortable truth is that the only reliable way to inspect hidden stainless is to remove it. Without removal, even a surveyor can't see crevice corrosion, internal cracking or pitting on the back side of the plate. If your boat is old, if you've found any of the red flags above, or if the chainplates are original on a boat with a leaky deck, it's worth planning the job.
A few safety points apply. Never remove a chainplate while its shroud is carrying load. Support the mast with spare halyards, work on one chainplate at a time, and if you aren't sure how to do this safely, ask a rigger to supervise or do it for you.
Once the plate is out, clean it and examine it closely with a bright light and a magnifier. Dye penetrant testing is the standard low-cost next step. It's worth knowing what it does and doesn't do: dye won't reveal cracks you can't otherwise see, but it helps you tell a scratch from a real crack, and because cracks often start inside fastener holes, the plate has to be out of the boat to be tested properly. If you're not certain what you're seeing, a specialist non-destructive testing firm can give you a second opinion.
Encapsulated and Glassed-In Chainplates: Your Options
If your chainplates are fully encapsulated, the usual advice from experienced boat repairers is blunt. If there's a leak around an encapsulated chainplate, and over a boat's lifetime that is a when, not an if, the base of the plate can sit in stagnant water and corrode. The best way to deal with it is to open up the encapsulation, inspect the plate, and, if needed, fit new plates attached in a way that gives the required strength.
| Option | When It Suits | Trade-Off |
|---|---|---|
| Open up and inspect the plate | Older boats, any sign of leaks or staining, or before an ocean passage | Needs careful laminate or joinery work, and the plate must be re-secured properly afterwards |
| Open up and replace with accessible plates | Plates show corrosion, or you want future inspections to be easy | Highest cost and effort; get the design and strength checked by someone qualified |
| Professional assessment first | You aren't sure how serious the situation is or how to open up the structure safely | Costs a fee, but gives you a defined scope before you cut anything |
| Treat as unknown and avoid hard use | A temporary stance while you plan the work | Not a fix: the risk remains until the plate has actually been seen |
Whichever route you choose, take photographs before, during and after, and note the size, material and position of each plate. It will help the next inspection, and it's useful evidence if an insurer asks what has been done. Our guide to yacht insurance explains what insurers commonly look for.
Keeping Water Out and Making the Next Inspection Easy
Prevention is mostly about keeping water out of the gap. Make sure all flanged hardware is fully bedded, not just the fasteners, and renew the sealant on a schedule: marine press guidance suggests that even the best sealants need renewing after about five to seven years. One experienced owner's approach is to re-bed on the outside only and leave the inside unsealed, so that if a leak develops you see it at once rather than discovering it later.
If joinery hides your chainplates, consider making the covering panels removable. One cruising couple who found their chainplates rusted through after years of neglect refitted their cabinetry so it could be taken off easily for regular checks, and that is advice worth borrowing. Add a look at each chainplate to your annual rig inspection, and keep a record of what you find.
Replace or Keep? Making the Decision
If a removed plate is clean, free of pitting and cracks, and passes a dye penetrant test, some owners choose to keep it and re-bed it. If you find crevice corrosion, pitting, cracks or an elongated hole, replace it. When you replace, ask your rigger or the boat's designer for the correct material, thickness and fastening for your boat rather than guessing. Chainplate age matters too, and the same factors that drive standing rigging age apply here, as we explain in How Long Does Standing Rigging Last? Age, Sea Miles and the Insurer's Rule. A re-rig is the ideal moment to look at the chainplates, because the rig is already down and the load is off.
Buying a Used Boat: Chainplates as a Survey Item
Hidden chainplate corrosion on an ageing fibreglass boat is one of the biggest survey items, and some designs have a reputation for it because of poor sealing, bulkhead rot or inaccessible installations. When you're looking at a used boat, find out which type of chainplate it has, ask whether they've ever been removed or replaced, and ask to see any records. If they can't be inspected, budget for opening them up. Our sailboat survey checklist and guide to buying a used sailboat show where chainplates sit in the wider inspection.
Summing Up
A chainplate is a simple piece of metal with a very important job, and the places it fails are the places you don't look. Start with the checks that cost nothing: staining, leaks, soft bulkheads and movement. If anything looks wrong, or the boat is old and the plates have never been out, take one out and look at it properly, using dye penetrant to tell scratches from cracks. If the plates are encapsulated, treat them as unknown until they've been opened up. Keep the sealant fresh, make access easier for next time, and never rely on the visible part of a chainplate to tell you the condition of the hidden part.
Frequently Asked Questions
Can I inspect an encapsulated chainplate without cutting into the bulkhead?
Can I inspect an encapsulated chainplate without cutting into the bulkhead?
Not reliably. You can look for warning signs such as staining, deck leaks and discoloured or soft bulkhead material, but these only suggest a problem. The best way to know the condition of an encapsulated plate is to open up the encapsulation, inspect the plate and, if needed, replace it with plates that can be inspected in future.
How often should I check my chainplates and re-bed the deck sealant?
How often should I check my chainplates and re-bed the deck sealant?
Include a look at each chainplate in your annual rig inspection, and check below deck for moisture after rain. Marine press guidance suggests that even good sealants need renewing after about five to seven years, but if you see a leak sooner, act sooner.
Does a dye penetrant test prove that a chainplate is sound?
Does a dye penetrant test prove that a chainplate is sound?
No. Dye penetrant helps you tell a scratch from a real crack, but it won't reveal cracks you can't otherwise see, and the plate has to be removed so you can test the hidden section and the fastener holes. It's a useful part of an inspection, not a guarantee.
What does crevice corrosion look like on a chainplate?
What does crevice corrosion look like on a chainplate?
Often it looks like very little. Typical signs include rust-coloured pitting, discolouration, and fine hairline cracks running across the plate at right angles to the load. The visible part can look perfect while the hidden part is badly corroded, which is why removal is the only certain check.
Should I replace my chainplates when I re-rig?
Should I replace my chainplates when I re-rig?
Not automatically, but a re-rig is the ideal time to inspect them, because the rig is down and the load is off. If the plates are clean and free of cracks, some owners keep and re-bed them. If you find corrosion, pitting or cracks, replace them.
Recent Articles


-
Downeaster 32 Review, Specs & Bluewater Cruising Guide
Nov 20, 26 05:55 PM
Detailed Downeaster 32 review covering specs, performance, construction, common problems, bluewater capability and buying advice. -
Swage or Mechanical Rigging Terminals? Spot Failure Early
Nov 20, 26 04:06 PM
Swage terminals can crack out of sight. Learn the warning signs, how dye testing helps, and when Sta-Lok or Norseman fittings are the better choice. -
Wauquiez Pilot Saloon 60 Review, Specs & Bluewater Buying Guide
Nov 20, 26 09:01 AM
Detailed Wauquiez Pilot Saloon 60 review covering specs, performance, seaworthiness, ownership, buyer checks and bluewater cruising suitability.